Often the usage of GIS never touches the world of programming and I think a lot of GIS users today feel fine with using simple tools and try to avoid tools like Python for their daily work. Despite any prejudices regarding programming, Python can be a big help in your basic tasks and is a very easy scripting language to learn. So let us check out Python in ArcGIS and QGIS with a buffer analysis as an easy example. Nevertheless I recommend to take some coding lessons in Python using CodeAcademy.
Jump to the QGIS or ArcGIS python syntax for buffer.Accessing Python in GIS
The Python interface is not very “hidden” in both GI systems.Access in QGIS
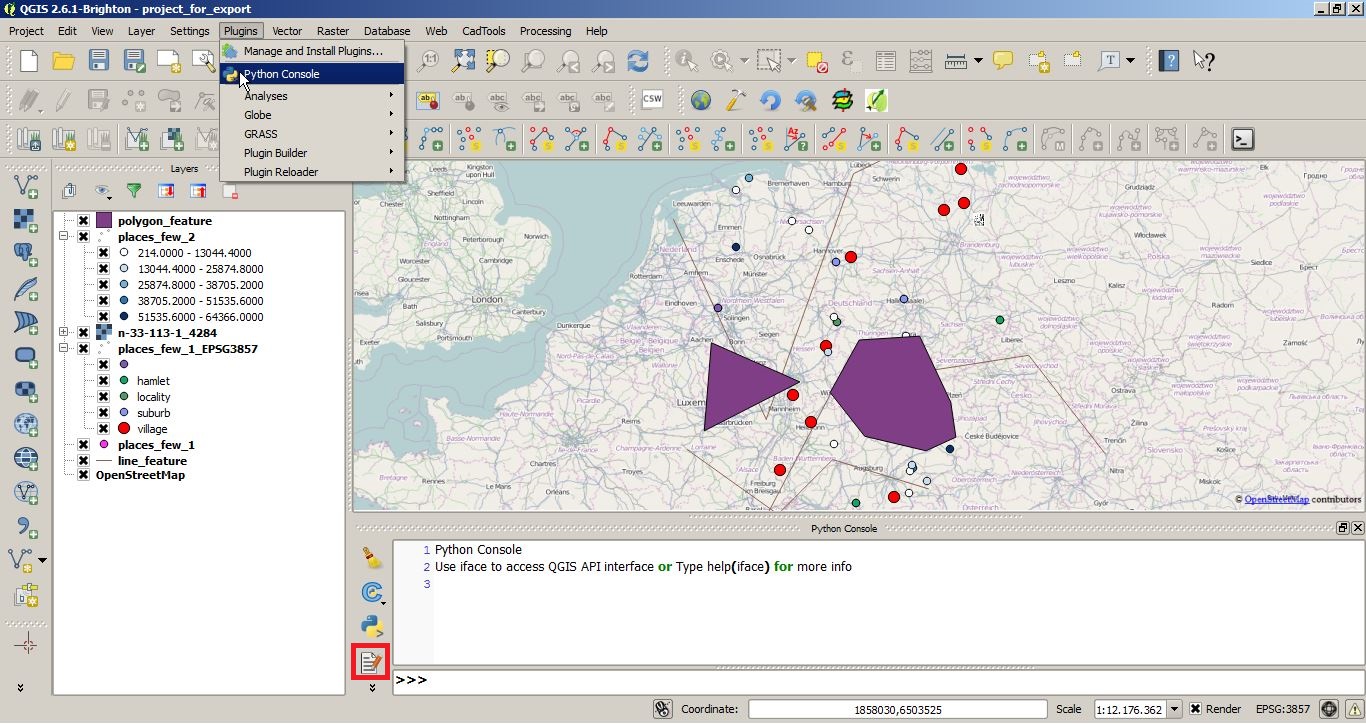
For QGIS simply go to Plugins –> Python Console and you will see a nice console in your QGIS working window. The console shouldn’t be the preferred way to work with Python. This should be a script you can write and were you can execute commands from:
The Python console itself has an input line in the main lower part and an output window in the upper main part. As QGIS provides an enhanced integration of Python the script editor will help you with a code-completion functionality like ArcGIS which will enables you to easily find possible functions and methods for your current “object”. Let’s make a simple first statement by writing
canvas = iface.mapCanvas()
After writing this in the input line you will have it already executed by hitting the Enter button. If you’re using the script editor you can store the script and run everything or you just select this line and use the right mouse button to select just to run this one line as it is selected. Now you have all your objects from your working canvas available in the variable called canvas. Of course the canvas has much more then just layers but let’s stick to current active one by using another command to interfere with your data in the project:
layer= iface.activelayer()
As you might expect all the layers are now stored in your variable allLayers.
Access in ArcGIS
The first real class used for Python in QGIS was called iface which is part of qgis.utils. In ArcGIS we have a similar situation as most of the functionality is part of arcpy. But let’s first check how to get there. You open the Python console in ArcGIS/ArcMAP via the main dialog Geoprocessing–>Python:

Unfortunateley ArcGIS 10.3 does not provide a script editor like QGIS so you need to copy paste your syntax to another application, text editor or Python IDE. Also the ArcGIS Pzthon console show syntax suggestion and a help section to explain the syntax for a given arcpy command/class/function:


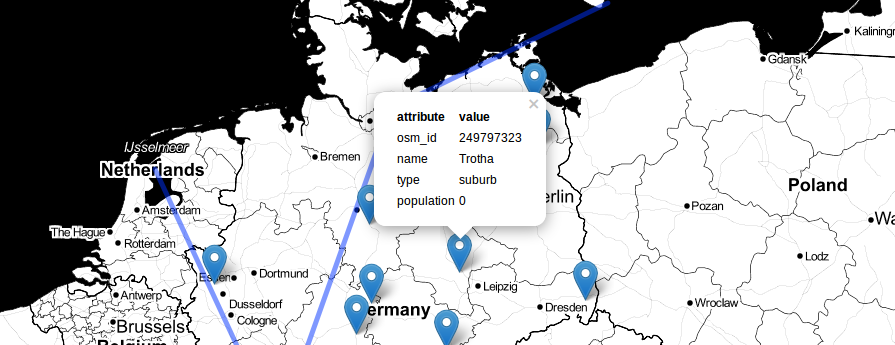
Of course we can get some information about our layers. Therefore we use the Describe function:
arcpy.Describe("places_few_2")
If you want to make it unspecific of the name of the current layer using the pythodaddin module:
import pythonaddins
mxd = arcpy.mapping.MapDocument('current')
layer = pythonaddins.GetSelectedTOCLayerOrDataFrame()
layer.name
But it seems like the integration of Python into ArcGIS is orientated more towards ArcGIS whereas QGIS tends to utilize Python for QGIS workflows and therefore tries to make QGIS available for Python…
Using Python in GIS
As we have now enabled Python in ArcGIS or QGIS let’s create some buffers around some features.
Buffer Tool in QGIS
QGIS itself has a great toolbox where you can access all the commands for raster and feature based analysis from a central hub. Those commands are also available in the Python console after importing the library of processing algorithms:
import processing
processing.alglist()
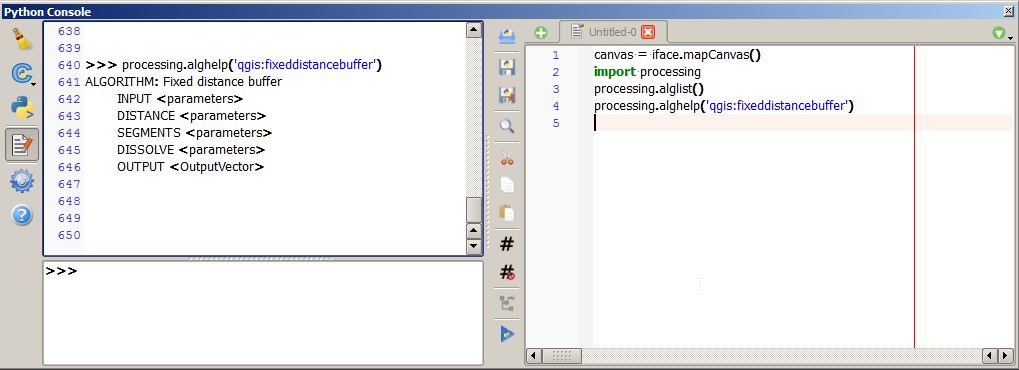
The second command will show you a list of all algorithms and commands available with QGIS (it’s more then 600…) which are grouped into algorithm-providers like GRASS, SAGA, R or of course QGIS. As we see from this list we will find a algorithm called qgis:fixeddistancebuffer which is the normal distance buffer on features with a given distance.
processing.alghelp('qgis:fixeddistancebuffer')
The above line whill show you the help section and some usage info for this function:
So we can easily run this tool with this line in the python console:
processing.runalg("qgis:fixeddistancebuffer","layer-name-you-need",0.1,10,False,"Path-to-file-to-store")
If you’re unsure about some parameters in the the algorithm you can check with with the function (our algroithm has none):
processing.algoptions('qgis:fixeddistancebuffer')
In our example we can determine the layer name automatically by using layer.name() instead of “layer-name-you-need”. The next parameter defines the distance in units of the input feature (in our case it was degrees) and the “10” is the nmber of segments to use for a quarter of a circle (more is better but uses more vertices on the resulting polygon). In the end my python call for a selected layer would be:
import processing
layer = iface.activeLayer()
processing.runalg("qgis:fixeddistancebuffer",layer.name(),0.1,10,False,"C:/Users/ricckli/Desktop/buffer_test.shp")
vlayer = QgsVectorLayer('C:/Users/ricckli/Desktop/buffer_test.shp', "buffer", "ogr")
QgsMapLayerRegistry.instance().addMapLayer(vlayer)
As in the first command (where we accessed all layers in the canvas) you can also iterate over all your layers. But this is another post…
Buffer Tool in ArcGIS
The buffer function is listed as an Analysis function in the help section of ArcGIS. The content of the help is very convenient and you’ll probably find most of the stuff you need as well as usage suggestions and examples and many more:

As we see the syntax need at least three parameters (you’ll notice optional parameters as they are marked):
- in_features: The name or the path of the features to create a buffer for
- out_feature_class: pick a name or a path for the shapefile
- buffer_distance_or_field: should be a field name or a value with a given unit like Meters or Feet or Decimal Degrees
arcpy.Buffer_analysis("places_few_2","C:/Users/ricckli/Desktop/buffer_test_arcpy.shp", "0.1 DecimalDegrees")
But be warned. The result seems to be different when defining a shapefile as output instead of a simple layer like in this code line:
arcpy.Buffer_analysis("places_few_2","buffer_test_arcpy", "0.1 DecimalDegrees")
In both cases the result will be added to your table of content and you can see it right away.
Ressources
Here are some ressources on Python in QGIS and ArcGIS:QGIS
QGIS WorkshopDeveloper Cookbook
Book on Amazon
Spatial Galaxy examples
QGIS tutorials
questions and answers on gis.stackexchange
ArcGIS
Arcpy at the ESRI help deskArcPy café
Extended tutorial on python scripts in ArcGIS
Free training by ESRI
Another training by ESRI
Pennstate course
I hope you found it usefull. I’ll upload two videos for both in a few days. I appreciate any comment.
Nice introduction Riccardo. I would clarify the beginning of QGIS part where you talk about the console. Did you upload videos that you’re talking about at the end? They would probably make this easier to understand for beginners. At the end of “Access in QGIS” you’ve mentioned allLayers variable which doesn’t exist, is it because of missing code example?