Some days ago I’ve presented a way to load and monitor the content of a shapefile using pyshp. But since then I was remembering my work with shapefiles in my basic R-seminars and the way we have used the gdal-library for our data management. So I searched the web and found comparable solutions for the project “where are your customers” in Python. You was probably using open source solutions already or are a user of ArcGIS and was frickling around with the Python-interface (new in ArcGIS since version 10). I would like to show you here some basic steps to create and edit a shapefile just by using Python.
So once again: the basic task is the creation of points representing your customers with customizable attributes. So lets start;
path='/home/rikl/Dokumente/Python/shapefile/customer_points.shp'
import osgeo.ogr, osgeo.osr #we will need some packages
from osgeo import ogr #and one more for the creation of a new field
spatialReference = osgeo.osr.SpatialReference() #will create a spatial reference locally to tell the system what the reference will be
spatialReference.ImportFromProj4('+proj=utm +zone=48N +ellps=WGS84 +datum=WGS84 +units=m') #here we define this reference to be utm Zone 48N with wgs84...
Now we have the basis for our shapefile creation with python. But to create a shapefile for ArcGIS we will need a so-called driver for this operation as different GIS have different shapefile-definitions.
driver = osgeo.ogr.GetDriverByName('ESRI Shapefile') # will select the driver foir our shp-file creation.
shapeData = driver.CreateDataSource(path) #so there we will store our data
layer = shapeData.CreateLayer('customs', spatialReference, osgeo.ogr.wkbPoint) #this will create a corresponding layer for our data with given spatial information.
layer_defn = layer.GetLayerDefn() # gets parameters of the current shapefile
point = osgeo.ogr.Geometry(osgeo.ogr.wkbPoint)
point.AddPoint(474695, 5429281) #create a new point at given ccordinates
featureIndex = 0 #this will be the first point in our dataset
##now lets write this into our layer/shape file:
feature = osgeo.ogr.Feature(layer_defn)
feature.SetGeometry(point)
feature.SetFID(featureIndex)
layer.CreateFeature(feature)
## lets add now a second point with different coordinates:
point.AddPoint(474598, 5429281)
featureIndex = 1
feature = osgeo.ogr.Feature(layer_defn)
feature.SetGeometry(point)
feature.SetFID(featureIndex)
layer.CreateFeature(feature)
shapeData.Destroy() #lets close the shapefile
Now lets have a look on the attributes. We need to create new attributes to get a nice representation of our customer attributes on the map:
shapeData = ogr.Open(path, 1)
layer = shapeData.GetLayer() #get possible layers.
layer_defn = layer.GetLayerDefn() #get definitions of the layer
Now let’s create a list of attributes using a loop:
field_names = [layer_defn.GetFieldDefn(i).GetName() for i in range(layer_defn.GetFieldCount())] #store the field names as a list of strings
print len(field_names)# so there should be just one at the moment called "FID"
field_names #will show you the current field names
For the creation of a new field we will need some informations like name of the field and also the differentiation of character/numeric informations…
new_field = ogr.FieldDefn('HOMETOWN', ogr.OFTString) #we will create a new field called Hometown as String
layer.CreateField(new_field) #self explaining
new_field = ogr.FieldDefn('VISITS', ogr.OFTInteger) #and a second field 'VISITS' stored as integer
layer.CreateField(new_field) #self explaining
field_names = [layer_defn.GetFieldDefn(i).GetName() for i in range(layer_defn.GetFieldCount())]
field_names #WOOHAA!
But what are fields without any informations? We need to fill in our stuff! As an example I show here, how to enter informations for the field ‘HOMETOWN’ as it is represented as a string. Keep in mind to define the correct position of the field:
feature = layer.GetFeature(0) #lets get the first feature (FID=='0')
i = feature.GetFieldIndex("HOMETOWN") #so iterate along the field-names and store it in iIndex
feature.SetField(i, 'Chicago') #exactly at this position I would like to write 'Chicago'
layer.SetFeature(feature) #now make the change permanent
feature = layer.GetFeature(1)
i = feature.GetFieldIndex("HOMETOWN")
feature.SetField(i, 'Berlin')
layer.SetFeature(feature)
shapeData = None #lets close the shape file again.
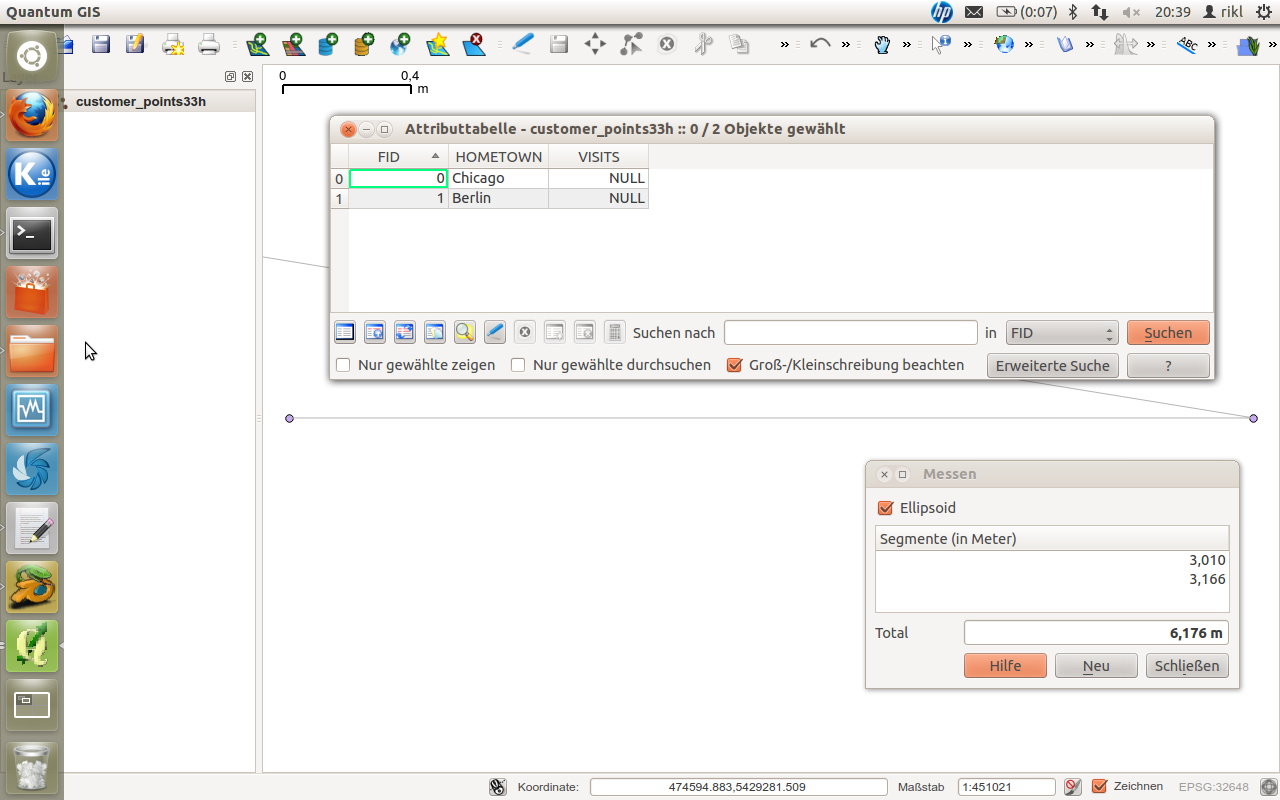
So this is the result:
If you want to download the py-file click on the following: create_edit_shp.py
You can watch the output here:
Shapefiles created with Python auf einer größeren Karte anzeigen

thank you for this greta tutorial. exactly what i was looking for!
[…] simple web-map running on our website, it may be a need for some persons to distribute their own shapefiles using a web-map. In this case it is a good choice to take a closer look on GeoServer. This will […]
Thank You so much! I was looking for something like this since long and now I have it! Thanks again. 🙂
I am diving into python GDAL/OGR and this is going to help a lot! Thank you